


Digital backdrops have transformed modern photography by eliminating location constraints and weather dependencies. These versatile tools allow photographers to place subjects in any environment imaginable, from exotic destinations to fantasy worlds, all from the comfort of a studio or home setup.
This comprehensive guide walks you through everything you need to know about digital backdrops. You'll learn what they are, how to use them effectively, and discover professional techniques for creating seamless, realistic composite images that elevate your photography business and artistic vision.
Understanding Digital Backdrops
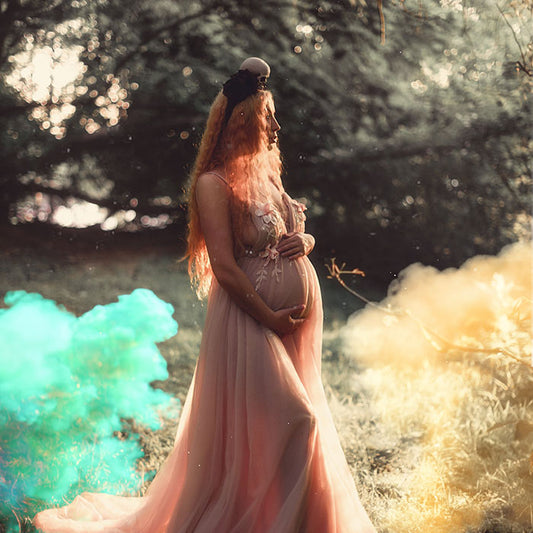
Digital backdrops are high-resolution background images designed to replace the original background in your photographs. They function similarly to physical backdrops in traditional photography, but offer unlimited creative possibilities without the storage requirements, setup time, or location limitations. Here are some examples:

When you photograph a subject against a simple background (ideally green or blue screen, but even plain walls work), you can later remove that original background in editing software and replace it with any digital backdrop. This technique, called compositing, creates the illusion that your subject was photographed in the backdrop's location.
Professional digital backdrops come in countless varieties: outdoor landscapes, urban settings, studio environments, seasonal scenes, holiday themes, fantasy worlds, and abstract designs. Each backdrop is crafted with proper perspective, lighting, and resolution to ensure professional results.
Step-by-Step Guide to Using Digital Backdrops
Creating professional composite images requires attention to detail at every stage. Follow this comprehensive workflow for seamless results.
Step 1: Photograph Your Subject Properly
Success with digital backdrops starts during the photoshoot. Use a solid-colored background, preferably green or blue for easier removal. Position your subject several feet away from the backdrop to prevent color spill and allow for natural shadow falloff. Ensure even lighting on both subject and background to simplify the extraction process.
Consider the perspective and lighting direction of your intended digital backdrop when photographing. If the backdrop shows lighting from the right side, light your subject from the same direction. Match the eye-level perspective of the backdrop by adjusting your camera height accordingly.
Step 2: Select Your Editing Software
Professional compositing requires capable editing software. Adobe Photoshop remains the industry standard, offering advanced selection tools, layer masking, and blending options. Affinity Photo provides similar capabilities at a lower price point. Both applications support the techniques needed for professional backdrop integration.
Step 3: Remove the Original Background
Background removal accuracy determines the quality of your final composite. Use the selection tools in your editor to isolate your subject. Modern software offers AI-powered selection tools that detect subjects automatically. For complex subjects with hair or fur, use refine edge tools to capture fine details while removing the background.

Create a layer mask rather than permanently deleting the background. This non-destructive approach allows adjustments later if needed. Zoom to 100% and carefully examine edges, refining any areas where the background shows through or subject details were lost.
Step 4: Choose the Perfect Digital Backdrop
Select a backdrop that matches your creative vision and suits your subject. Consider the season, time of day, environment, and mood you want to convey. Browse our extensive digital backdrop collection to find options ranging from natural outdoor scenes to stylized artistic environments.
Pay attention to the perspective and lighting in potential backdrops. The viewing angle should match your subject's position. Lighting direction and quality should complement how you lit your subject during the shoot. These matching elements create believable composites.
Step 5: Position and Scale the Backdrop
Import your chosen backdrop into your editing software and place it as a layer behind your subject. Adjust the size and position to create proper perspective. Your subject should appear naturally placed within the environment, not floating awkwardly or disproportionately sized.
Consider the horizon line in the backdrop and ensure it aligns logically with your subject's position. If photographing a standing person, the horizon should typically fall near their eye level. Adjust the backdrop's position up or down to match this natural perspective.
Step 6: Match Lighting and Color
Lighting consistency makes or breaks composite realism. Examine the light direction, intensity, and color temperature in your backdrop. Adjust your subject layer to match using adjustment layers, curves, and color balance tools.

If the backdrop features warm golden-hour lighting, add warmth to your subject. For overcast or indoor scenes, cool the tones slightly. Match the contrast levels between subject and backdrop. High-contrast backdrops require punchy contrast on the subject, while soft backdrops need gentler toning.
Pro Tip: Adobe Photoshop's "Match Color" feature can automatically harmonize colors between your subject and backdrop layers. While it requires fine-tuning, it provides an excellent starting point for color matching.
Step 7: Add Realistic Shadows
Shadows anchor your subject to the environment. Without them, subjects appear to float unrealistically. Create shadow layers beneath your subject layer. Use a soft brush with black paint at low opacity to paint shadows where they would naturally fall based on the lighting direction.
Consider both contact shadows (directly under the subject where it meets the ground) and cast shadows (extending away from the subject in the opposite direction of the light source). Contact shadows are darker and sharper, while cast shadows are softer and lighter as they extend outward.
Step 8: Refine Edge Integration
Examine the edges where your subject meets the backdrop. Hard, sharp edges often reveal compositing. Add a subtle blur or feather to these edges to create natural transition. Use a small, soft eraser at low opacity to gently blend problem areas.
For subjects photographed outdoors or in bright conditions, add a subtle rim of light along edges where light would naturally wrap around from the backdrop's light source. This integration technique significantly improves realism.
Step 9: Apply Depth and Atmosphere
Real scenes contain atmospheric perspective, where distant elements appear hazier and less saturated than foreground elements. If your backdrop shows depth, add subtle haze or reduced contrast to distant areas to enhance this effect.
Consider adding selective blur to backdrop elements based on depth. Use the lens blur filter on background layers to simulate camera focus characteristics. This depth-of-field effect makes subjects pop and creates more photographic realism.
Step 10: Final Adjustments and Export
Apply final color grading across all layers to unify the image. Use adjustment layers affecting the entire composition to ensure cohesive color harmony. Add sharpening to your subject if needed, and perform final contrast adjustments.
Export your completed image at appropriate resolution and file format for its intended use. For client delivery or printing, maintain high resolution (300 DPI). For web use, optimize file size while preserving visual quality.
Professional Techniques for Realistic Composites
Mastering these advanced techniques separates amateur composites from professional results. Each detail contributes to creating images where viewers cannot detect the digital manipulation.
"To make digital backdrops look real, pay attention to small details. Get the light, angle, and colors right to make truly awesome pictures."
Matching Light Direction and Quality
Light direction must remain consistent between subject and backdrop. Study the backdrop carefully to determine where the light source originates. Shadows, highlights, and reflected light on backdrop elements reveal this information. Your subject's lighting should originate from the same direction with similar intensity and hardness.
Soft, diffused lighting from overcast skies requires different subject lighting than harsh directional sunlight. Indoor backdrops with window light need different approaches than outdoor scenes. Plan your subject photography with the intended backdrop in mind, or select backdrops that match your existing subject lighting.
Perspective and Camera Angle Alignment
Perspective inconsistencies immediately reveal compositing. The camera angle used for the backdrop must match the angle used for your subject. If the backdrop was shot at eye level, your subject should also be photographed at eye level.
Transform and warp backdrop layers slightly if needed to better match subject perspective. Use the perspective transform tool to adjust vanishing points and horizon lines. Small adjustments create dramatic improvements in realism.
Creating Convincing Shadow Layers
Shadows require multiple layers for realism. Create separate layers for contact shadows (dark, sharp, directly beneath) and cast shadows (lighter, softer, extending outward). Use different blending modes for each, typically Multiply for contact shadows and Soft Light for cast shadows.
Sample colors from the backdrop ground surface and incorporate them into shadow layers. Shadows are rarely pure black but rather darkened versions of the surface color. This technique creates shadows that integrate naturally with the backdrop environment.

Color Harmony and Temperature Matching
Color temperature consistency creates unified images. Analyze the backdrop's color temperature using the eyedropper tool on neutral gray or white areas. Adjust your subject's color temperature to match using color balance or temperature/tint adjustments.
Consider ambient light color reflected onto your subject from the environment. If the backdrop shows lush green grass, add subtle green tint to shadow areas on your subject. Blue skies cast blue ambient light. These reflected colors, though subtle, significantly improve integration.
Edge Refinement and Light Wrap
Edges require meticulous attention. Zoom to 100% and examine every edge pixel. Use refine edge tools to recover fine hair details while eliminating background color contamination. Add a subtle outer glow or brightness along edges where backlight would naturally occur, creating light wrap effect.
For subjects with complex edges like hair, consider adding slight transparency and color from the backdrop bleeding into the hair edges. This simulates how real camera sensors capture translucent materials with environmental influence.
Atmospheric Integration
Add atmospheric effects to enhance realism. Smoke, fog, dust, or haze can bridge the gap between subject and backdrop. Use smoke overlays or create subtle haze layers between your subject and backdrop to add depth and atmosphere.
Consider lens effects that would naturally occur when photographing scenes. Add lens flare overlays if the backdrop shows strong directional light sources. These realistic optical effects convince viewers they're viewing a straight photograph rather than a composite.
Depth of Field Simulation
Real photographs exhibit depth of field where only certain distance ranges appear in focus. Apply selective blur to backdrop areas based on their distance from the focal plane. Keep the area immediately around your subject sharp, then gradually increase blur for elements further away.
Use lens blur filters rather than simple Gaussian blur for more photographic results. Adjust blur amount subtly. Excessive blur looks artificial and reveals manipulation. Subtle depth effects look natural while adding dimensional separation.
Combining Multiple Backdrop Elements
Advanced compositing often involves combining elements from multiple backdrops. You might use the ground from one backdrop, sky from another, and add environmental props from additional sources. This technique requires careful attention to lighting and perspective consistency across all elements.
Build scenes in layers, working from background to foreground. Establish consistent lighting direction across all elements. Add atmospheric haze between layers to create depth. This layered approach provides ultimate creative control.
Practice and Iteration
Skill with digital backdrops develops through repetition. Your first composites may appear obvious, but each project teaches lessons about lighting, perspective, and integration techniques. Study how other photographers create composites. Analyze commercial photography to understand how professionals handle these challenges.
Experiment with different approaches to the same composite. Try various shadow techniques, color adjustments, and blending methods. Compare results to identify which methods produce the most realistic outcomes for different situations.

Key Benefits of Using Digital Backdrops
Digital backdrops offer photographers significant advantages that improve both creative possibilities and business operations.
Unlimited Creative Possibilities
Place subjects in locations that would be impossible, impractical, or prohibitively expensive to access. Fantasy environments, exotic destinations, historical settings, or abstract artistic spaces become available without travel, location fees, or permits. Your creativity determines the limits, not your budget or geography.
Significant Cost Savings
Eliminate travel expenses, location rental fees, and time spent scouting and commuting to shooting locations. A comprehensive digital backdrop library costs less than a single destination shoot while providing unlimited reuse. This makes diverse, high-production-value imagery accessible for photographers at any budget level.
Weather Independence
Weather cancellations and rescheduling become problems of the past. Shoot in your controlled studio environment regardless of rain, snow, extreme heat, or poor outdoor lighting. Deliver consistent quality to clients without weather-related delays or compromises.
Time Efficiency
Complete multiple different "locations" in a single session without moving your setup. Offer clients multiple background options from one shoot, increasing perceived value while reducing shooting time. Spend time on lighting and posing rather than location changes and setup.
Seasonal Flexibility
Create spring garden scenes in winter or snowy Christmas photos in summer. This seasonal independence allows you to market holiday sessions year-round and deliver themed imagery regardless of actual weather and foliage conditions.
Consistent Aesthetic Control
Maintain consistent branding and style across your portfolio. Use the same backdrop setups for multiple clients, creating signature looks that define your brand. This consistency helps establish your photographic identity and makes your work instantly recognizable.
Enhanced Client Satisfaction
Offer clients more options and faster turnaround times. Preview different backdrop options during the shoot or in post-production. Deliver multiple versions of images with different backgrounds, increasing package value and client satisfaction.
Safe and Comfortable Shooting Environment
Work in controlled, comfortable conditions ideal for subjects of all ages and physical abilities. This particularly benefits newborn photography, senior portraits, and sessions with young children or individuals with mobility challenges. Eliminate concerns about insects, uneven terrain, or environmental hazards.
Explore Our Complete Backdrop Collection
Browse hundreds of professional digital backdrops covering every style and season. From natural outdoor scenes to creative fantasy environments, find the perfect backdrop for any project.
View All BackdropsEnhancing Images With Photoshop Overlays
Overlays add finishing touches that elevate composites from good to exceptional. These elements introduce realistic environmental effects, lighting enhancements, and atmospheric details that increase believability.
Sky Overlays
Sky overlays transform bland or overexposed skies into dramatic cloudscapes. Choose from sunny blue skies, moody storm clouds, vibrant sunsets, or starry night skies. Properly integrated sky overlays add impact and mood while maintaining realistic lighting relationships with your subject.
When adding sky overlays, ensure the light direction and color temperature match your subject and ground elements. Adjust opacity and blending modes to integrate skies naturally. Add atmospheric haze near the horizon for realistic depth.
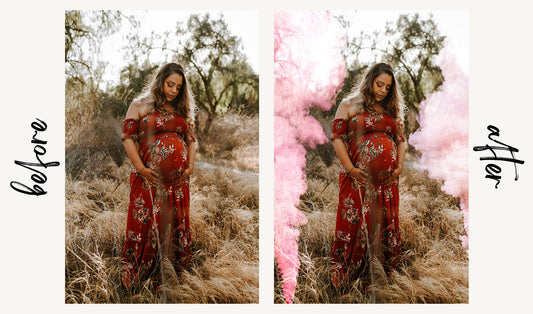
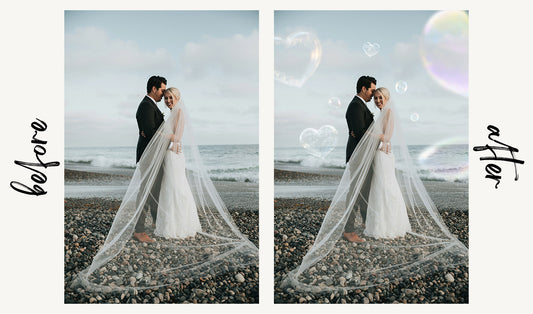
Bubble Overlays
Bubble overlays create whimsical, dreamy atmospheres perfect for children's portraits, fantasy images, or playful compositions. Layer multiple bubble overlays at different sizes and opacities to create depth. Adjust colors to match your overall image tone.
Bubbles work particularly well in outdoor scenes with natural light. Position them strategically to lead the eye toward your subject without obscuring important elements. Subtle application maintains realism while obvious use creates intentional artistic effect.
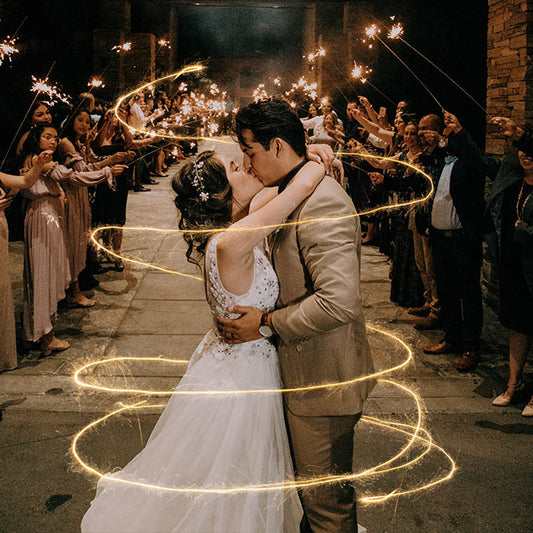
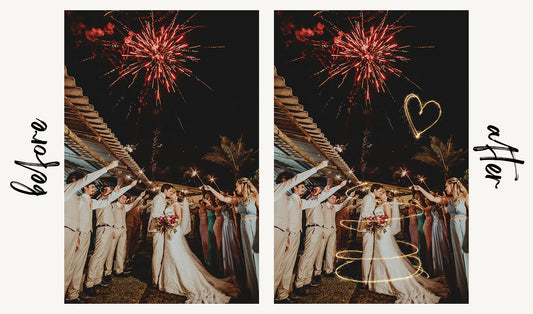
Sparkler and Light Effects
Sparkler overlays add magical light effects, bokeh, and illumination to images. These work beautifully for holiday portraits, celebration photos, and creating enchanted atmospheres. Adjust blending modes (typically Screen or Lighten) to integrate light effects naturally.
Consider where light effects would logically appear based on your scene's light sources. Add subtle glow around these effects using outer glow layer styles to simulate light diffusion. This integration technique prevents overlays from appearing pasted on.
Shadow Overlays
Shadow overlays provide pre-made shadow shapes that save time and ensure realistic shadow placement. These work particularly well for product photography and when creating shadows for multiple subjects in consistent lighting.
Transform and warp shadow overlays to match perspective and adjust opacity based on lighting conditions. Bright, harsh lighting creates darker, sharper shadows while soft lighting produces lighter, diffused shadows. Adjust overlay properties to match your specific scene.
Overlay Integration Tip: Always adjust overlay colors to match your image's overall color palette. Use hue/saturation adjustments or color balance to ensure overlays harmonize with your composite rather than standing out as added elements.
Digital Backdrops for Different Photography Specialties
Different photography genres benefit from digital backdrops in unique ways. Understanding specialty-specific applications helps you maximize backdrop effectiveness.
Portrait Photography
Portraits benefit enormously from digital backdrops offering diverse locations without travel. Urban environments, architectural settings, natural landscapes, and artistic abstracts provide variety that keeps your portfolio fresh and appeals to different client preferences.
Choose backdrops that complement your subject without overwhelming them. Simple, slightly out-of-focus backgrounds work well for professional headshots. More detailed, in-focus environments suit lifestyle and environmental portraits. Match backdrop mood to subject personality.
Product Photography
Product photographers use digital backdrops to show products in context without expensive location shoots. Display outdoor gear in mountain settings, home products in styled interiors, or food items in appealing restaurant environments.
Pay particular attention to lighting consistency in product composites. Products must appear naturally placed within their backdrop environment. Match perspective carefully, ensuring products don't appear to float or sit at unnatural angles.
Wedding Photography
Wedding photographers offer clients fairy-tale locations regardless of venue limitations. Transform parking lots into garden venues, plain halls into elegant ballrooms, or create romantic sunset scenes on command.
Use backdrops to enhance rather than completely replace wedding venue reality. Clients appreciate venue representation but love dramatic sky replacements, enhanced gardens, or magical lighting effects that elevate standard locations.
Fine Art and Conceptual Photography
Fine art photography thrives on impossible scenes and surreal environments. Digital backdrops enable artistic visions limited only by imagination. Combine multiple backdrops, add fantastical elements, and create scenes that exist nowhere in physical reality.
This genre permits obvious compositing when serving artistic vision. However, technical excellence remains important. Even surreal images require proper lighting consistency, perspective accuracy, and integration techniques for professional results.
Newborn Photography
Newborn photography faces unique challenges with subjects requiring specific temperatures, safety considerations, and minimal session duration. Digital backdrops solve these challenges by allowing photographers to shoot in controlled studio environments while offering diverse themed imagery.

Choose soft, gentle backdrops appropriate for newborn aesthetics. Fantasy themes like clouds, flowers, or storybook settings remain popular. Ensure backdrops provide enough safe, flat space for newborn positioning. Safety always takes priority over creative vision in newborn photography.
Pet Photography
Pets benefit from digital backdrops that eliminate environmental distractions and safety concerns. Photograph pets in controlled studio settings, then place them in parks, beaches, or seasonal environments digitally.
Fast shutter speeds necessary for active pets work better with controlled lighting than outdoor conditions. Composite techniques allow beautiful environmental context while maintaining technical excellence required for sharp pet photography.
Complete Your Toolkit With Professional Overlays
Enhance your backdrop composites with our extensive collection of Photoshop overlays. Add atmospheric effects, lighting enhancements, and finishing touches that elevate your work.
Browse OverlaysCommon Mistakes and How to Avoid Them
Understanding common compositing errors helps you avoid them in your work. These mistakes immediately reveal digital manipulation to viewers.
Inconsistent Lighting Direction
Lighting from different directions on subject versus backdrop ranks as the most obvious compositing error. Always verify light source direction matches between all elements. Add highlighting and shadowing to your subject that aligns with backdrop lighting.
Mismatched Perspectives
Camera angle differences create unnatural compositions. A subject photographed at eye level cannot logically inhabit a backdrop shot from a low angle. Match shooting angles during capture or carefully select backdrops photographed from similar perspectives.
Missing or Unrealistic Shadows
Floating subjects without shadows immediately reveal compositing. Every object in lit environments casts shadows. Create appropriate shadow layers for every composite. Study real shadow behavior to understand hardness, opacity, and color characteristics.
Color Temperature Mismatches
Cool-toned subjects on warm backdrops or vice versa create visual discord. Use color adjustment layers to harmonize temperature across all composite elements. Sample backdrop colors and apply complementary tints to your subject.
Oversharpening or Excessive Detail
Over-sharpened subjects on natural backdrops look artificial. Match sharpness levels between subject and backdrop. If the backdrop shows natural softness, avoid excessive sharpening on your subject. Maintain consistent detail levels throughout the image.
Poor Edge Integration
Hard, obvious edges reveal cut-and-paste work. Spend time refining edges with appropriate tools. Add light wrap, subtle blur, and color bleed where appropriate. Zoom to 100% and examine every edge pixel critically.
Ignoring Atmospheric Perspective
Subjects appearing as crisp and saturated as immediate foregrounds despite being positioned in distant backdrop areas violate natural atmospheric perspective. Add subtle de-saturation and haze to subjects positioned in deeper backdrop regions.
Quality Check: Before finalizing composites, view them at various sizes and zoom levels. Errors obvious at 100% may disappear at normal viewing sizes, while some integration issues only become apparent when viewing the overall composition.
Building Your Digital Backdrop Workflow
Efficient workflows save time while maintaining quality. Develop systematic approaches to backdrop photography and compositing.
Planning Shoots for Backdrop Use
Pre-visualize final composites before shooting. Select potential backdrops and analyze their lighting, perspective, and environment. Light your subject to match these characteristics during capture. This planning dramatically reduces post-processing time and improves results.
Organizing Your Backdrop Library
Organize backdrops into logical categories: indoor/outdoor, season, time of day, style, and color palette. Tag backdrops with characteristics like lighting direction, perspective angle, and dominant colors. This organization helps quickly locate appropriate backdrops during editing.
Creating Editing Templates
Develop Photoshop actions or templates for common backdrop workflows. Save layer structures for shadow creation, color matching, and integration effects. These templates accelerate repetitive tasks while ensuring consistent quality.
Maintaining Quality Standards
Establish quality benchmarks for your composites. Create checklists covering lighting consistency, shadow presence, edge quality, color harmony, and perspective accuracy. Review every composite against these standards before delivery.
Continuous Skill Development
Study compositing techniques through tutorials, courses, and analysis of professional work. Experiment with new integration methods. Request feedback from other photographers. Skills compound over time with dedicated practice and learning.
Final Thoughts
Digital backdrops have democratized high-end photography by making diverse, professional locations accessible to photographers regardless of budget or geography. Mastering backdrop compositing requires technical knowledge, artistic sensibility, and attention to detail, but the investment pays dividends in creative freedom and business efficiency.
Start with simpler composites and progressively tackle more challenging scenarios. Study how light interacts with subjects and environments. Analyze professional composite work to understand integration techniques. Practice regularly, and your skills will develop steadily.
The key to convincing composites lies in thorough planning, technical precision, and subtle integration. Match lighting, respect perspective, create realistic shadows, harmonize colors, and refine edges meticulously. These fundamentals, consistently applied, produce composites that viewers perceive as straight photography rather than digital manipulation.
Digital backdrops expand creative possibilities while solving practical challenges. They enable you to deliver diverse, high-quality imagery efficiently and profitably. Embrace these tools, develop your compositing skills, and watch your photography reach new creative and professional heights.
Transform Your Photography Today
Explore our complete collection of professional digital backdrops and overlays. Everything you need to create stunning composite images is just a click away.
Start CreatingReady to elevate your photography with professional digital backdrops? Browse our extensive collection and discover the perfect backgrounds for every creative vision.