


Intro
The wonderful thing about Lightroom is its ability to save certain settings for use on other photos later. This opens up a wide variety of options for your workflow. Unfortunately, Adobe never really explains how to do it. So the question is, how do you create Lightroom presets? Luckily, it's super easy. For the purpose of this tutorial, I'll be showing you how to create a simple preset that will enhance the blue and add a little detail to a landscape photo. If you already have a preset you want to save ready to go, then skip to the "Saving Your Preset section.

Creating The Settings
With Lightroom open, make sure you are on the Develop tab at the top and then open up the basic tab on the right-hand side. This is where we'll begin making some adjustments to our photo. First, raise the contrast a little to somewhere around +5 - +10. Go ahead and lower highlights and raise shadows as well. For this photo I put highlights at -29 and shadows at +43.
Next, let's add some clarity and vibrancy to the photo. I put my clarity at +38 and vibrance at +29.
Now jump down to the HSL section. Look for the saturation sliders and raise the blue slider up to +70 or so. This is the main part of the preset that will enhance the blue. Add a little detail as well to somewhere around +60 for a slightly cleaner photo. I also added a slight vignette at -10.
Saving Your Preset
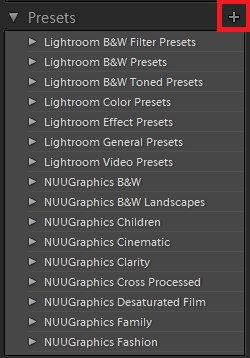
Now that you have set-up certain settings, you'll want to save it as a preset for later. All you want to do is go to the left-hand side of Lightroom and look for the preset area and click on the plus sign. You can also click on "Develop" then "New Preset" at the top of your screen if you don't see a plus sign.
From here a new window will pop-up to allow you to pick what settings you would like to save. This is useful if you want a preset to only change one thing - such as clarity and not highlights, for example. This will also make your preset "stackable" so it can be used with other presets as long as the other preset doesn't change that setting.
After you've selected the settings you want to save, you can then name it and select a folder you would like to put it inside. Finally, click on "create" to save the preset. You can now find it in the presets section of the Develop tab and you can use it whenever you like with any photo you choose.
Now that you know how to create Lightroom presets, learn how to install them.