
What is Bokeh?
Bokeh comes from the Japanese word boke which basically means blur. Bokeh simply put, is the effect of low depth of field blurring the light that is not focused. The depth of field is the distance between the nearest and the furthest objects to the camera.
The lower the depth of field, the more of the background and things far away from the camera will be blurred, whereas things close to the camera will be in focus.
For example, in the photo below that my girlfriend took, you can see that only the flower is in focus but the background is blurry and unfocused. This is because she had a low depth of field with the aperture set wide at f1.8.
Because everything in the background was further away, it was blurry and unfocused and thus created bokeh. But since the flower was close to the camera, it was in focus.
You can still create bokeh even with a higher f-stop but you will need to get very close to the subject you are shooting.
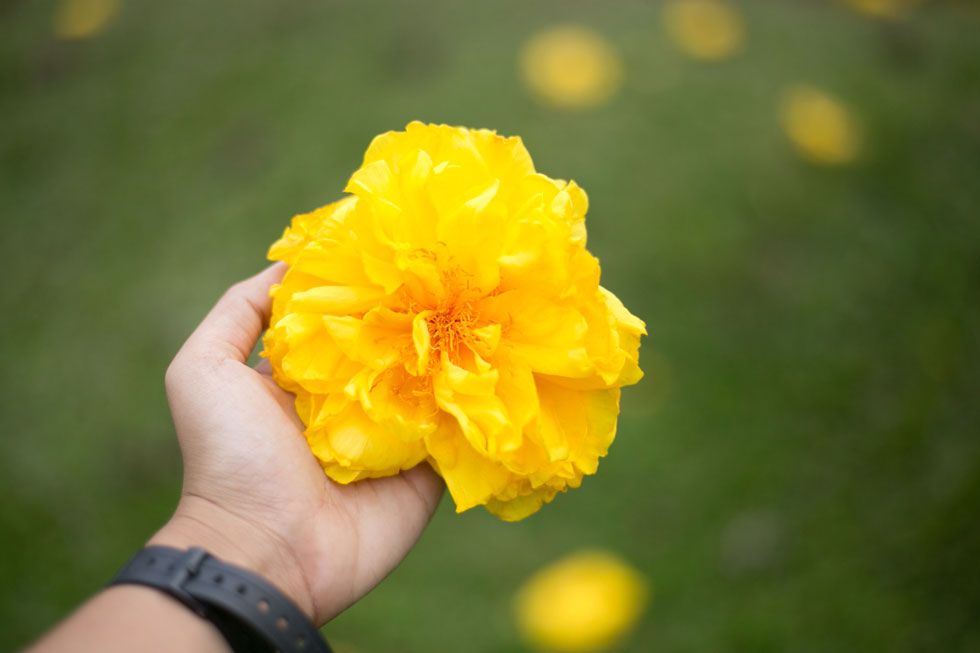
In this example above, the bokeh even created balls of yellow (other flowers)
Now try for yourself, simply take your camera, switch to manual focus and then point at a light source. Get close if you need to. Slowly unfocus until you see the image getting blurry. Now you will start to see the bokeh appearing.
Usually, the bokeh will come out as circles because of the shape of your lens. By simply adding a filter over your lens, you can change the shape of it to whatever you want. That's what I'll be showing you today.
So enough talk, let's start making.
Here's Everything You'll Need to Make Custom Bokeh Shapes

- Camera (duh)
- A lens with a large aperture, preferably 1.8 or lower.
- The lens cap of that lens for tracing
- Black poster paper
- Pen
- Scissors
- Craft Knife
- Tape (optional)
Making The Filter
Start by taking the black poster board and tracing a circle around the lens cap. The reason to use black paper is that it reflects the least amount of light meaning you'll see the bokeh more clearly.
Next, cut the tracing out using your scissors. Make sure to get it as tight as possible so it fits nicely on your lens later.
Then, begin drawing any shape you desire on the circle with your pen - such as a heart or triangle. Make sure not to draw the shape too big, however. If it's too big then the effect won't be very noticeable as too much light will be entering the lens.
Make the shape small and in the middle of the circle for the best effect. Here's what my shape of a star looked like:
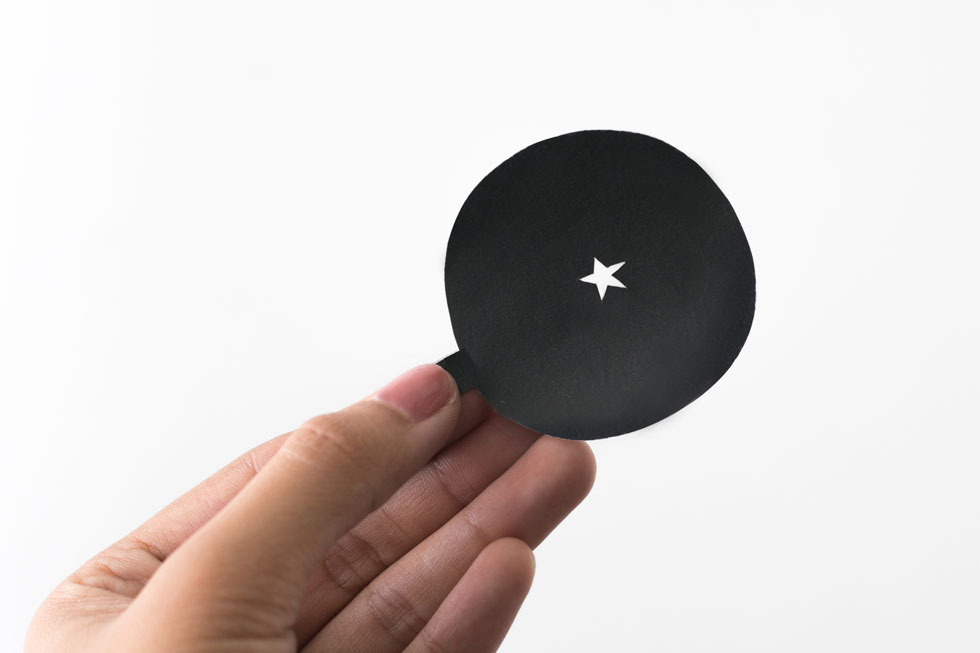
After you've drawn your shape, take your craft knife and cut out the shape you drew leaving just the hole of the shape left.
How to Use The Custom Bokeh Shapes
Now you're ready to attach it to your camera. All you want to do is put the black paper with the shape in front of your lens.
You can use tape and simply tape it down on top of your lens but if you don't wish to do that, then simply holding it in front of your lens will work just fine as well. You can also have somebody else hold it for you.
You could even stuff it into the inside of your lens, just make sure the center is not creased as to ruin the shape.

Now, switch your camera to manual mode. Manual mode will allow us to take full effect of the bokeh shape to see it in action by allowing us to unfocus to the maximum. *Remember that only unfocused points of the photo will be affected by this. Focused points will not see bokeh.
Now find some lights or a light source and point your camera at it. Rotate the slider so that nothing is in focus. As your unfocusing, you should start to see the custom bokeh shape you created come into view.
As you can tell, there are many different possibilities and shapes you could come up with. You could even use the custom shapes to record video. Now that would be interesting, heh? The sky is the limit, so have fun with it and enjoy your new bokeh filters!
Also, here are some photos I took using a custom heart and star shape I made. If you used this tutorial, post your results below, I would love to see.


Questions & Answers
- What ISO works best?
The ISO doesn't matter, only the f-stop (or depth of field) is what matters in this case. For the best effect, try to use f1.8 or lower. ISO is only for the sensitivity of light, we want the background to be blurred to create the bokeh. This is done by widening the lens, not by increasing or decreasing sensitivity to light.
- Should I zoom in or out?
It depends on what lens you are using. If you are using a lens with an f-stop higher than 1.8 then you should zoom in or get close to your subject or both.
The closer you get to your subject will increase background blur and bokeh. In that case, zooming into your subject from far away would have the same effect as being close to them.
- Shoot at day or night?
It also doesn't matter if you shoot with the custom bokeh in the daylight or at night. However, if you shoot at night, you'll need more light or longer exposure time. Having a tripod, in this case, would be better.
If you have any more questions, please leave a comment below and let me know!
Prefer an Easier Way?
Alternatively, if you feel a bit lazy but still want to add some cool bokeh effects to your photos, (or your lens isn't wide enough) then check out our bokeh overlays kit for Photoshop which includes circles, hearts, and star shapes.